Whittling Projects You Can Do At Home
Featured Knife: Case® Stockman
From the layout to rough out, this carving uses the most basic of carving skills and allows for your total creative freedom throughout the process.
For this project I used my Case® Stockman that I have sharpened and honed myself. A sharp blade will make the process easier and even more enjoyable. If you find yourself pushing through cuts, you could be working with a dull blade, or you are attempting to take too much material at a time.
The wood of choice for this piece will be basswood pre-cut to a suitable size. This cuts down on the time it will take to rough out the piece. When finished, the carving can easily slip into your pocket allowing you to take your craft with you.

Placing the image on the wood can be done by drawing it, printing the image to be glued to the wood, or using carbon paper to transfer the image.

Begin by removing all the material surrounding the feather. Be careful when carving around the quill because it is thin and will be fragile. I recommend using a larger blade when roughing out a piece.
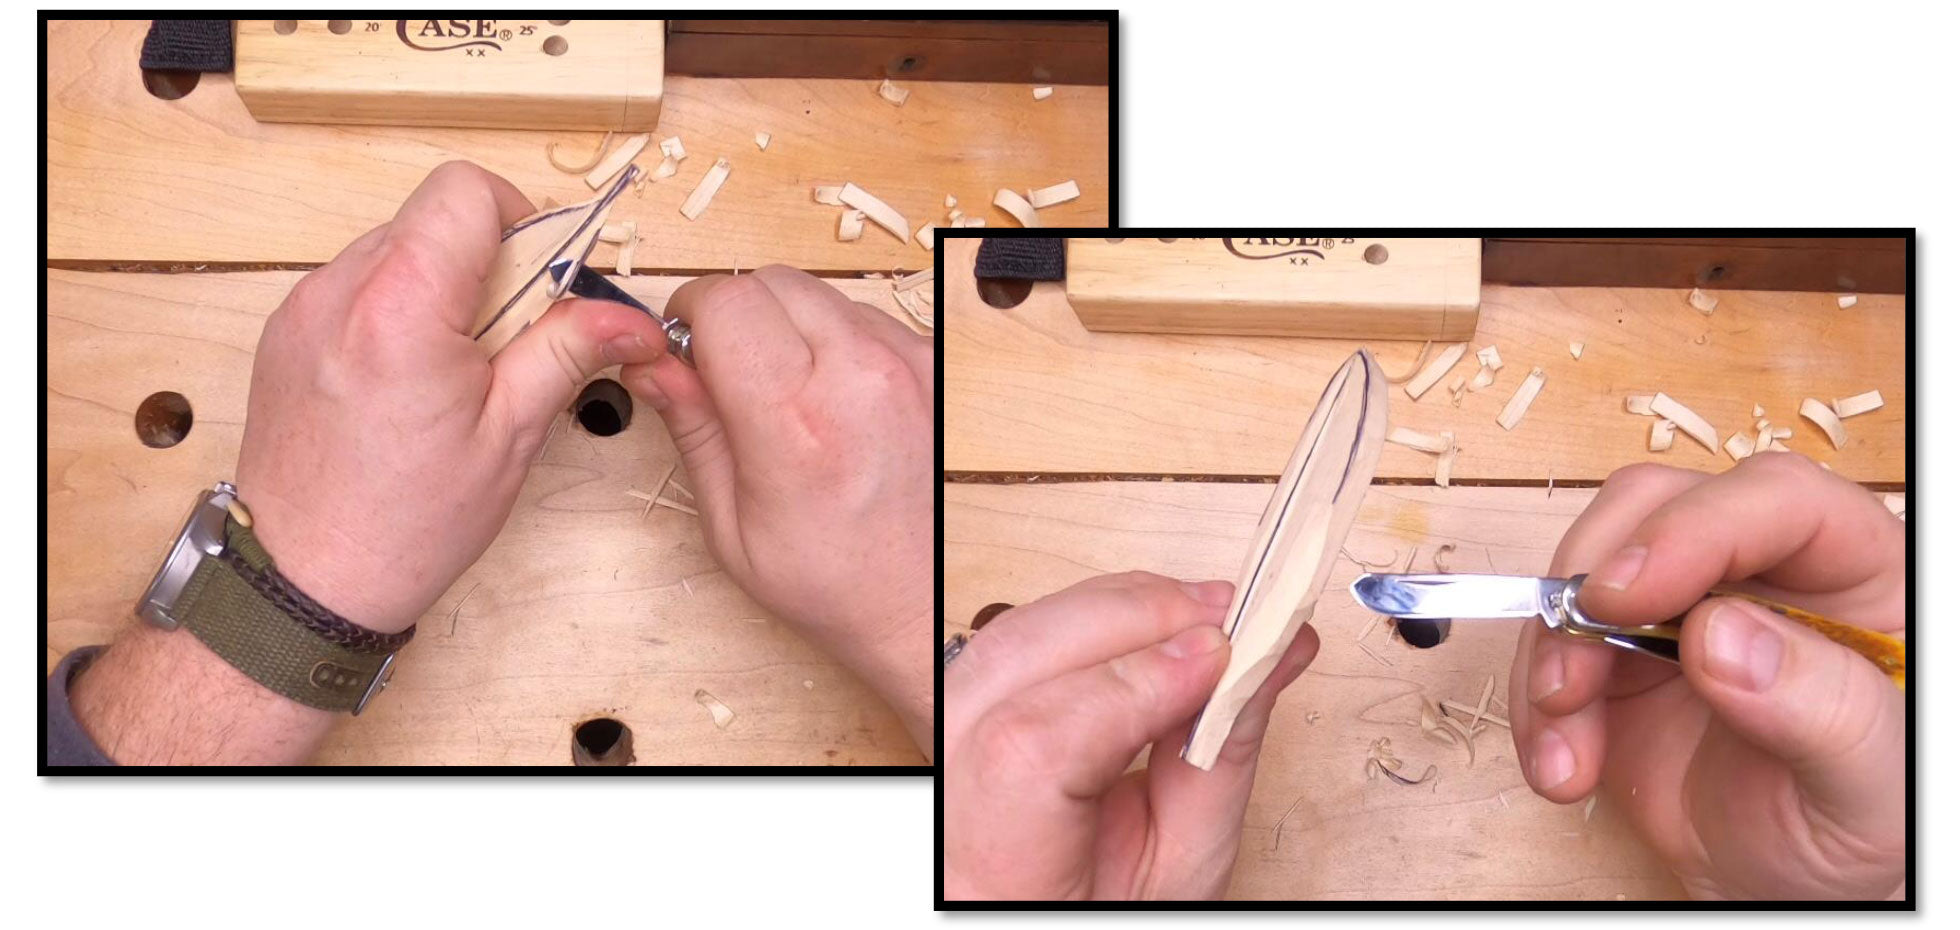
Notice in the photograph on the right that my hands are close together. This gives me more control in the cut by pivoting off of the left thumb.

Using the sheepfoot blade make a score line down the left and right sides of the feather shaft. This will establish stop cuts for the next step.

With the stop cuts established, switch to a spay blade (any blade with a rounded tip) and place follow up cuts into the stop cuts. This will establish the center shaft of the feather. If after the secondary cuts the wood does not fall away freely, go back and run the blade down the stop cuts again. The goal of the secondary cuts here is to meet up at the base of the stop cuts.
With the stop cuts established, switch to a spay blade (any blade with a rounded tip) and place follow up cuts into the stop cuts. This will establish the center shaft of the feather. If after the secondary cuts the wood does not fall away freely, go back and run the blade down the stop cuts again. The goal of the secondary cuts here is to meet up at the base of the stop cuts.

Once we have completed shaping the front portion of the feather, we can now create the illusion of being thin by removing material from the back. You do this by removing material up to the edge of the front portion. Beginning with the edges and working your way to the center you can keep the back flat or put in a curve mimicking the shape of a feather. The decision depends on what you want to do with the final piece. If it is going to be viewed from the front only, you should keep the back flat. If the plan is to hang the carving or place it into a small vessel such as an ink well, then rounding the back side would work better.

With both sides being shaped we can start adding detail to give the feather some character. Going back to the sheepfoot blade we can place a break in the vein. Starting with stop cuts on the two sides of the break you follow that up with a slicing cut to the stop cut. Working your way back and forth down to the desired depth. If you choose to take the break through the feather then you will want to follow up by going to the back side and thinning the two sides down to match the profile of the rest of the feather.

Using a blade with a rounded tip can help when placing slicing cuts into the back side of the feather. Think of the blade like a chisel when making these cuts, letting it slice in and lift away the material. Don’t forget to cut with the grain or across the grain, this will limit the chance of any tear out or breaks.

To give the impression of veins in the feather, use the tip of the sheepfoot to make shallow score lines down both sides. Start at the base keeping the lines angled and parallel to one another placing them one next to the other. Although subtle the lines will stand out more once finished.

To make the lines stand out and pop I simply add a little linseed oil to the feather and wiped it away. Because I mainly carve hardwoods, I generally do not add color to my carvings, but when I do there are some tricks I have learned. If you water down acrylic paints, you can apply it to the carving like a stain. Adding little by little, you can control the amount of color going into the carving while at the same time allowing the grain of the wood to show through.
Final Thoughts
If the piece has a dirty appearance when completed you can use dish soap and give the piece a wash to remove the dirt, and oil prior to adding color. Keep in mind that you will want to do this step prior to adding any actual finishing oil to the carving. use a finishing pad (3M between coats finishing pads) after the washed piece is dry to remove any raised areas that may pop up due to getting it wet.
Some of my favorite feather carvings came from the scrap pile of cut offs. Those smaller oddly angled pieces that do not seem to be useful for anything else or the random piece that results from splitting wood. Just use your imagination, and you will see opportunity.
Video Tutorial
You’ll find a complete video tutorial of this project at https://youtu.be/kna9NSKyy5s
Download The PDF
Get the document version of this tutorial. Click here to download the file.
About the Craftsman
Brian McKinney is a self-taught carver from Virginia with his wife, four children, two dogs, and very soon some baby goats. For more examples of his work, you can find him on Instagram @McCarvings and on YouTube under the channel name TheCarver.
